Cloth Diapering: What Did We Choose?

I have put a lot of time and energy into researching the various methods of diapering. Not only did I spend time comparing the pros and cons of both cloth and disposable diapers, I also compared the different types of and costs of cloth diaper systems, and researched what all was needed to cloth diaper, how to store cloth diapers and how to wash cloth diapers. I read enough product reviews to last a life time. Armed with knowledge, Ronny and I sat down, discussed the options and came up with a plan that was most cost effective and what we felt was best for our family.

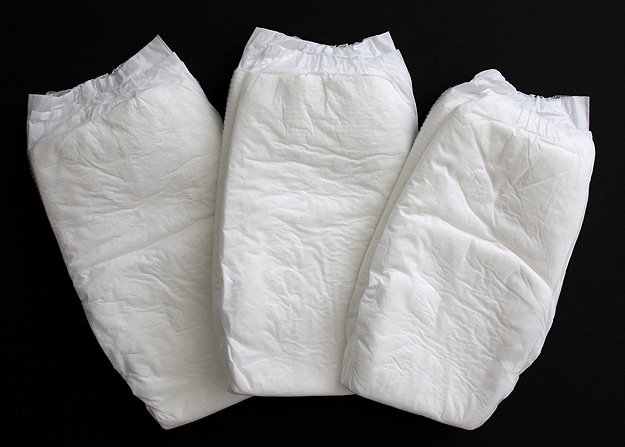
We will be utilizing a combination of both cloth and disposable diapers. We will be using disposable diapers from the time Luke is a newborn until he can fit into the one size cloth diapers and his umbilical cord has fallen off. The one size diapers should start fitting him when he reaches 9-10 pounds. We will then switch over to cloth diapers during the day, and continue to use disposables at night and if we are going to be out and about for a while.

After comparing the various styles, costs, pros and cons of cloth diapers, we decided that the flip style diaper would be the best fit for us. We chose the flip style diaper because it is easy to use, is both size and absorbency adjustable, the cover can be used more than once before needing to be washed, and we have options as far as inserts go. We also decided to go with the diapers with snaps vs. Velcro because I have read that the Velcro on diapers becomes worn out quickly.

I did a bit of research and discovered I could make my own diapers for a fraction of the cost to purchase them retail (roughly $3 per diaper cover instead of $20 per diaper cover) and I  could create my own soaker inserts from the Gerber prefolds found in store. Each insert would cost $1.20 to make instead of $4.97 each to purchase. All in all, we will spend roughly $80 to cloth diaper Luke until he is 2 and a half, and we should have enough disposable diapers from our baby shower to make it until he is potty trained.

While we are already using cloth diapers, it wouldn’t be that much more work to use cloth wipes. My husband and I discussed this and Ronny has put his foot down and said no to the cloth wipe idea. We have also chosen to incorporate biodegradable liners once Luke starts eating solid foods to make cleaning his diapers easier on us.

We purchased a small foot pedal trash can from Walmart to store dirty diapers in until laundry day. I will be using the dry pail method and washing the diapers every other day. I did make 2 PUL diaper pail liners so I can wash and reuse them, rather than waste trash bags. We will also be using a diaper genie essentials that was given to me for free by a woman at a baby consignment store that wouldn’t take her unused diaper pail. I bought 6 refill packs using $2 off coupons and will re-fill those with dollar store trashbags when we run out of the diaper genie ones.

I’ll let you know how it goes!
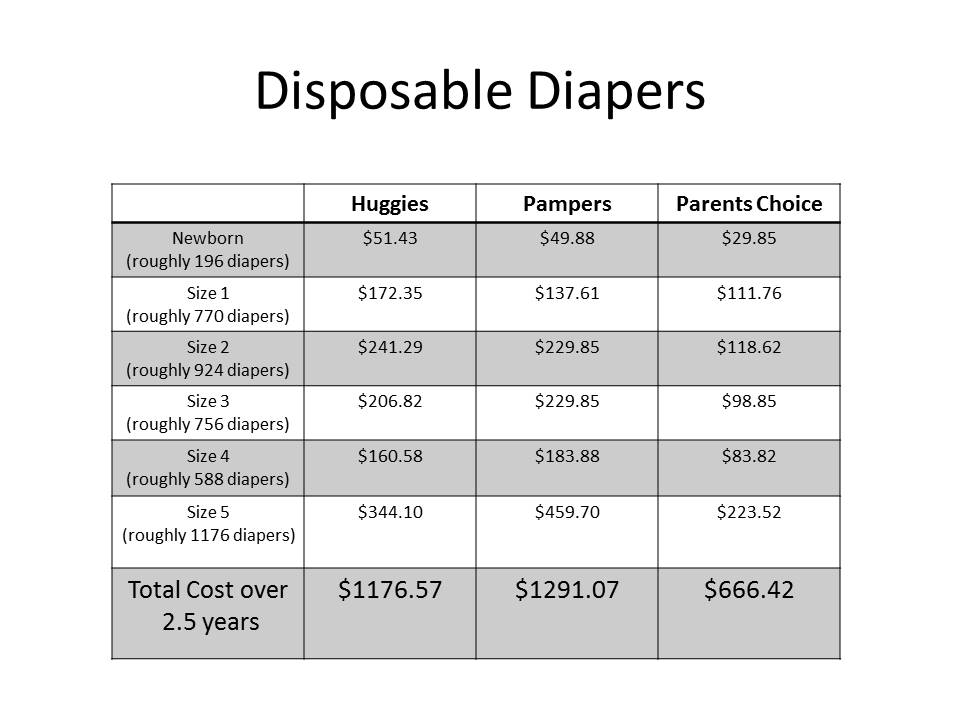
Washing Cloth Diapers

When it comes to cloth diapering, perhaps the most dreaded part of the whole thing is washing them. I know for me personally, this was the biggest factor in why I wasn’t originally going to cloth diaper our son. I didn’t want to have to rinse and store poopy diapers. After doing quite a bit of research though, I realized that it really isn’t as hard or as disgusting as it seems. Just an FYI: I will be discussing baby poop at great length in this post.

Depending on the age of the child, and what you are feeding them…. there are a few different ways to get poop off of the diaper. By far the easiest diapers to care for are the ones that have only been peed in. For only wet diapers, there is no rinsing involved. The second easiest diapers are those that have been soiled by a baby fed exclusively breast milk. Breast milk poop is completely water soluble and doesn’t need to be rinsed before being washed, as the poop will break up in the washer. Babies being fed formula or solid foods do produce bowel movements that need to be removed from the diaper prior to the diaper going in the washing machine. In order to do this there are a few different methods.

  1. Dump the solid bowel movement straight into the toilet. You may get all of the poop off of the diaper this way. The diaper can then be placed in the diaper pail until laundry day.
  2. If dumping the poop into the toilet did not get it all off, you can then dunk the diaper into the toilet water and swish the poopy part around.
  3. There are a few companies out there that make a diaper sprayer that connects to the plumbing already connected to the toilet. They work in the same way a sink sprayer works, directing high powered water at the diaper. This is the most effective way at rinsing the bowel movements out of diapers.
  4. Quite a few companies are now manufacturing biodegradable diaper liners that you place over the insert. The liners are a very thin material that lets liquids pass through, but collects solids on top. The liners can be disposed of in the toilet and flushed without ever having to rinse the bowel movement from the diaper.

One important thing to remember is that it is recommended that you go no longer than every other day when washing diapers. This will help prevent staining, odors and mold. You also never want to use fabric softener or bleach on cloth diapers.

So now that I have a bucket of soiled diapers what do I do with it?

  1. Start by rinsing the diapers in cool water on a short rinse cycle with no detergent. If you use the wet pail method, you are going to start with a spin cycle before moving onto step 2.
  2. Wash the diapers in a long hot cycle with detergent.
  3. Reset the washing machine and run one more cool rinse cycle with no detergent.
  4. Dry the diapers.

Most cloth diapers can now be machine dried, but be sure to check with the manufacture to make sure that machine drying is compatible with the diaper system you chose. Line drying is a cost effective method, and the sun can actually whiten the diapers. Line drying does take considerably more time than machine drying, but is free.

Sometimes cloth diapers stop performing like they once did. If your diapers are starting to leak or smell horribly, they will need to be stripped. Stripping removes mineral and detergent build up, and removes any residue that may have been used during diapering (diaper rash ointment). Stripping diapers is relatively easy, but requires careful monitoring. Rinse the diapers in hot water (rinse and spin cycle) until you no longer see any bubbles. This can take several cycles to do. Some people also say you can use 1 teaspoon Dawn Dish Detergent and then repeat the rinse cycle until you see no more bubbles. Dry the diapers as usual.

Is there anything else you would like to know about cloth diapering?

Cloth Diaper Storage

When it comes to storing soiled cloth diapers, there are essentially 2 different ways you can store the diapers until laundry day comes. There are pros and cons to each method, and the decision really varies depending on your needs. Diaper pails can be as simple as a bucket with a lid, to a trashcan with a locking lid or even something a bit more fancy. You can even modify a diaper genie essentials to be a cloth diaper pail.

Wet Pail

When using the wet pail method, soiled diapers are rinsed and placed in a bucket of water until wash day. Many people utilizing the wet pail method also use baking soda, white vinegar and essential oils in the water to help prevent staining and lessening possible odor.

  • Advantages to using a wet pail:
    • Soaking the diapers in water prior to washing them eliminates the need for a pre-wash cycle in the washing machine, reducing the overall cost of laundering them.
    • Soaking the diapers also helps reduce/eliminate stains on the diapers because the stains do not have time to dry into the cloth diaper.
    • Some parents feel that the wet pail method has less odor than the other methods (this depends on who you ask)
    • There is less of a chance for mold to grow on the diapers that are soaked in water, since they should be fully submerged.
    • Another advantage to the wet pail system is that you can launder less frequently as the diapers remain mold and odor free.
  • Disadvantages to using a wet pail
    • By far, the biggest con to the wet pail system is the possibility of drowning. Children can drown in just a few inches of water, so having a bucket of dirty water can be quite hazardous.
    • Another disadvantage to the wet pail system is that the diaper pail can get quite heavy. Lugging a pail of dirty diapers and water from their location to the washer can be strenuous.
    • The type of diaper you select, specifically those made of PUL, are not suitable for the soaking process. Soaking certain types of diapers can lead to the material becoming dry, cracked and less waterproof.
    • Depending on who you ask, the wet pail may smell. This can either be due to the soiled diapers stored inside or due to stagnant water.
    • The wet pail method can be a mess to clean up if the bucket tips over.
  • How to use the wet pail system:
    • Fill a bucket half way to three quarters of the way full with cold water.
    • Add in baking soda, vinegar or essential oils.
    • Rinse the solid matter off of diapers using the swish and dunk method or spraying them. Also make sure the diapers are unrolled before placing them in the bucket.
    • On wash day, dump the entire contents of the bucket water and all into the washing machine.
    • Run a spin cycle to remove the extra water and then proceed to wash the diapers as usual.
  • Wet Pail Recommendations
    • Get a pail with a locking lid or a lid that is difficult for little ones to remove. This will drastically reduce the ability for a child to drown in the water, and help prevent odor.
    • Under no circumstances should you ever add bleach or laundry detergent to the wet pail. This will cause the diapers to break down prematurely and is way too harsh.

Dry Pail:

When using the dry pail method, solid matter in the diapers is shaken into the toilet and then the diaper is tossed into the diaper pail as is. Diapers with only pee in them are placed into the dry pail as is as well. The whole pail is then washed and dried as usual. Baking soda, vinegar and essential oils can be used in the dry pail method as well.

  • Advantages to using a dry pail:
    • The first advantage to the dry pail method is that there is no risk of drowning as there is no water in the pail.
    • Dry pails are very simple: discard of any solid matter and put it in the pail. There is no rinsing involved.
    • The pail is lighter and easier to carry to the washing machine because there isn’t the extra weight of water.
    • Some parents feel that the dry pail method results in less odor.
  • Disadvantages to using a dry pail:
    • Staining can occur if the diaper dries out before being washed.
    • It is more difficult to control the odor in a dry pail.
    • Depending on who you talk to, dry pails can have more of an odor to them than a wet pail.
    • In using a dry pail, you will also need to either use a diaper pail liner or wash the pail frequently to prevent the odor from transferring to the pail.
  • How to use the dry pail system:
    • Line your pail with a washable liner. If you choose not to use a liner, you can skip this step, but be prepared to wash the pail out frequently.
    • Sprinkle baking soda in the bottom of the pail if desired. You can also put vinegar or essential oils on a rag and toss it into the bottom of the pail as well.
    • Place wet diapers into the pail unrolled. If the diaper has solid matter on it, shake it off into the toilet before placing the diaper into the pail. Always make sure the diaper is unrolled.
    • When it comes to laundry day, dump the diapers into the washing machine, along with the liner and run a rinse cycle.
    • Continue to wash as usual.

A third, and relatively new method is the wet bag method.

Wet Bag:

The wet bag method is very similar to the dry pail method, but eliminates the use of an actual pail. The liner is hung on a door or hook and then dumped into the washing machine on laundry day. The wet bag method has all of the same pros and cons that the dry pail method has, with the added advantage of not needing a diaper pail.

My husband and I discussed which system would be best for our family and decided that we were going to use the dry pail with reusable liners. You can make your own liners for considerably cheaper than buying them online. I show you how in this tutorial.

Which method did you choose for soiled diaper storage? Do you like the method that you chose?

Cloth and Disposable Diaper Cost Comparison

Costs of cloth diapers can vary depending on what system you choose, the brand and even the type of insert. To compare the cost of various cloth diapers I went to Kellyscloset.com. I only compared the cost of one size cloth diapers as they are adjustable and more cost friendly than purchasing diapers in small mediium or large. As the minimum recommended amount of diapers to have on hand by cloth mom’s around the world is 24, that is the number that I went with for pricing.

Slide1 Slide2 Slide3 Slide4 Slide5 Slide6

Cost saving tips:

  • Use prefold diapers in place of brand name soakers and inserts. By using prefold diapers you can save at least $100.
  • Make your own diaper covers. There are hundreds of free patterns online, and the process is quite simple. Using a pattern I found online I was able to create 20 flip style diaper covers for $43.97. By turning Gerber Birdseye prefolds into more manageable inserts I was able to create a modest sized stash for $80.54.
  • When you are finished diapering your child/children, resell them used on ebay or other diaper swapping sites. Often times you can get most of your money back.
  • Buy used. Again, ebay and diaper swapping sites have people sellling diapers they no longer need. Just make sure to buy some that are in good condition.

Types Of Cloth Diapers

Cloth diapers have come a long way from a square piece of cloth. There are now five major types of cloth diaper and numerous options.

photo credits

All In One (AIO) – All in ones are most similar to disposable diapers. The absorbent material is sewn onto the outer cover. If you wash them every other day, you will need 24-36 all in ones.

  • Pros
    • Easy to use – you do not have to stuff them, use pins or add an extra outer cover
    • Can be purchased as a one size fits all diaper or in multiple sizes
    • Easy on/easy off
  • Cons
    • Take a long time to dry – because it is all one piece, the inner absorbent layers take longer to dry
    • Not as easy to clean all of the layers
    • More difficult to adjust absorbency
    • Most expensive cloth diaper system option

Photo credits

All in Two (AI2)- Also known as hybrid diapers and flip diapers, all in twos have a removable soaker. To cloth diaper using AI2’s you will need 24-36 soakers as well as 6-10 outer covers.

  • Pros:
    • Take less time to dry because the pieces can be taken apart
    • Can be used with various inserts to adjust absorbency or material preference
    • Have a disposable option for easier travel
    • No need to touch a soiled diaper – just flip it into the storage bin and wash
    • Outer cover can be reused more than once before needing to be changed
  • Cons:
    • The inserts can move around in the diaper if they aren’t secured with a snap
    • Slightly more time consuming as you have to stuff the diaper before you put it on
    • Cover can get wet and leak
  • Examples: Grovia, Flip Diaper, gDiaper

Photo credits

Pocket Diapers – These are most like the AIO diapers discussed above, but have a small opening in the back in which you can change the soaker for absorbency. To launder every other day you would need 24-36 covers as well as 24-36 soakers. You cannot reuse the outer shell after baby has soiled the diaper.

  • Pros:
    • quicker drying time than AIO
    • Easier to tailor absorbency
    • No pins or extra outer shell needed
    • Easy to use
  • Cons:
    • Entire diaper needs to be changed after each use
    • Stuffing takes time
    • Unstuffing insert can be messy
    • Less options for inserts
  • Examples: Bumgenious 4.0, Charlie Banana, Fuzzi Buns

Photo credits

Fitted Diapers – Fitted diapers are a contoured cloth diaper with elastic around the waist and legs. They have the same shape and easy of use that a disposable diaper does, but require the addition of a waterproof outer cover. To launder every other day, you would need 24-36 fitted diapers as well as 6-10 outer covers.

  • Pros:
    • absorbent
    • contain leaks
    • easy to put on and take off
    • less messy than pocket diaper to clean
  • Cons:
    • Needs and outer cover
    • take longer to dry than an insert
  • Examples: Osocozy, Bummies

Photo Credits

Prefolds and Flats – Flats and prefolds are a rectangular diaper that are folded and wrapped around baby. Prefolds have an extra absorbent later sewn in to the middle of the diaper. This is a two step system, so you will need an extra outer cover. You will need 24-36 diapers and 6-10 covers.

  • Pros:
    • Most inexpensive option for cloth diapering
    • Dry fast and easy to wash
    • One size fits all
    • Can be used for other things
  • Cons:
    • Folding can be complicated
    • Require use of pins and an additional cover

What kind of cloth diaper style do you prefer?

Up Next: Cost of Cloth Diapering

What Do You Need To Cloth Diaper?

Last week I went over the pros and cons of both cloth and disposable diapers. When I was first looking into cloth and disposable diapers, one of the biggest concerns I had was what I would need to successfully and easily cloth diaper our child. Helping take care of my nephews gave me a pretty good working knowledge of things needed for disposables: diapers, wipes, a trash can and the occasional butt cream. Cloth diapers was a whole new experience.

So what exactly do you need in order to cloth diaper a child?

  1. Diapers- cloth diapers come in a variety of different styles. I will go over the different types of cloth diapers in my next post. Essentially you are going to need an absorbent material and a waterproof outer cover. The number of diapers you will need depends upon how frequently you plan to wash them and what style of cloth diaper you use. The generally accepted minimum number of diapers you will need is 24-36, which should be enough to wash them every other day. If you are looking at all in one or pocket style diapers, you will need a total of 24-36. If you are looking at using all in twos/hybrids, fitted or prefold style diapers you will need 24-36 soakers or inserts and 6-10 waterproof outer shells.
  2. Additional inserts or soakers – you may not need these, but it is good to have extras on hand if you need to add some absorbency to a diaper for nap time or overnight use.
  3. Wipes – you will need something to wipe the baby during a diaper change. You can use either disposable or cloth wipes depending upon your preference. Many cloth diapering moms prefer a spray bottle and a cloth rag that can be tossed in with the diapers for cleaning.
  4. Diaper pail or wet bag – you need something to store the dirty diapers in until wash day. I will go over different storage methods in an upcoming post.
  5. Travel wet bag – if you are planning on cloth diapering while you are out in public, you will need a waterproof bag to store the soiled diaper in until you get home.
  6. Laundry detergent – there are specialized laundry detergents out on the market specially made for cloth diapers. You can also use a gentle free and clear laundry detergent, but make sure not to use soap.

There are other  products out on the market that make cloth diapering easier. These are optional but helpful.

  1. Diaper Sprayer – a diaper sprayer hooks onto the existing plumbing connected to the toilet to make cleaning the poop off of diapers easier. You spray water on the poop and it will rinse right into the toilet.
  2. Pins/Snappis – these are good to have if you are using flats or prefolds with a waterproof cover. They hold the diaper in place.
  3. Liners – rather new to the cloth diaper movement are the use of liners in the diaper. The liner is made of a very thin biodegradable material that goes on top of the soaker to catch solid poops. When it comes time to changing the baby, you simply grab the sides of the liner, toss it in the toilet and flush. Some poop can make its way through the liner but it makes cleanup easier and leads to less staining.
  4. Cloth diaper friendly rash cream – not all creams are created equal when it comes to cloth diapers. Some can leave behind a residue that decreases absorbency of the material.

What else do you use when you cloth diaper?

Next Up: Types of cloth diapers

Pros and Cons of Cloth and Disposable Diapers

When it comes to diapers there are essentially two choices: cloth or disposable. While there are only two choices, each choice offers a variety of brands, styles and benefits. The decision on which type of diaper to use is not an easy one to make. One factor to consider is the pros and cons of each type of diaper.

IMG_3112

Cloth diapers became common in the 1800’s, in which a square fabric cloth was folded around a child and pinned in place. This style of cloth diaper is still in use today, known in the cloth diaper community as a flat. Cloth diapers have come a long way since the 1800’s. There are now many different styles, each with its own unique properties. While there are different styles, cloth diapers remain pretty much the same. An absorbent fabric is wrapped around a child and a waterproof cover is placed on top to prevent leaks. There are numerous pros to cloth diapering and quite a few cons as well.

PROS:

  • Cloth diapers are available using many different materials – cotton, wool, bamboo, fleece, flannel, hemp, terry cloth, polyurethane laminate (PUL), polyester…..the possibilities are endless.
  • Cloth diapers cost less overall than disposables – I will get into cost breakdown in a future post. Depending on the type of cloth diapering system or brand of disposables you choose and the size of your stash, you can save anywhere from $300-$2000 over a two and a half year period. You can use the same diapers on subsequent children which will reduce the overall cost even more.
  • Cloth diapers are eco-friendly – cloth diapers leave less of a carbon footprint because you wash and reuse the same diapers over and over rather than throwing them away after one use.
  • Cloth diapers lead to fewer diaper rashes – because cloth diapers do not have the chemicals in them that disposables do, they need to be changed more frequently. The more frequent diaper changes leads to less time a child is in a soiled diaper and the less likely they are for ammonia to build up on their skin.
  • Cloth diapers lead to an easier time potty training – because cloth diapers feel more like regular underwear than a diaper, children have a less difficult time transitioning from a diaper to underwear. The theory is that in a cloth diaper, the child can feel when they are wet and are uncomfortable and are more likely to want to use the toilet instead of going to the bathroom in their pants.
  • Cloth diapers have many purposes – cloth diapers can be used for many, many things. You can use them as burp cloths, dust rags, sensory blanket, mattress topper, kitchen towels, draft stoppers, rags to wash cars, pillow saver, doll blanket…….

CONS:

  • Cloth diapers need to be changed more often – because they do not contain highly absorbent chemicals, cloth diapers need to be changed more frequently than their disposable counterparts.
  • Cloth diapers are more difficult to change – most cloth diaper styles require some sort of “stuffing” in order to be absorbent. It takes a bit more time to stuff a diaper and then put it on a child than it does to pull a diaper out of the package and put it on. Additionally many styles of cloth diaper use snaps rather than Velcro to close. Wiggly babies are more difficult to snap the diaper on than to just attach the tabs.
  • Cloth diapers create more laundry – unless you choose a diaper service (which actually costs more than using disposables) you will have to wash and dry cloth diapers. This leads to an extra 2-3 loads of laundry a week if you wash them every other day.
  • Cloth diapers leak more than disposables – if you do not change a cloth diaper quick enough, bathroom matter could potentially leak out of the back or legs. Additionally if you do not attach the diaper properly it could also leak.
  • Cloth diapers are not convenient for travel – in the event that baby soils a diaper while you are running errands or out and about, you have to hold onto the diaper until you get home rather than toss it in the trash and put a clean one on.
  • Cloth diapers are not a hit at day care centers – I don’t know why this is the case but many centers refuse to use cloth diapers.

Johnson and Johnson released the first disposable diapers into the U.S. in 1948. Disposable diapers are all very similar in shape and materials, although there are brands out their that claim to be more eco-friendly and contain no harsh ingredients. Disposable diapers consist of a waterproof outer layer of polyethylene, a middle layer of super absorbent polymers that hold moisture, and a thin inner layer that wicks liquids away from the skin and into the middle layer.

PROS:

  • Disposable diapers are convenient – disposables are done after one. You put the diaper on and when it gets dirty you take it off and throw it away. You do not have to rinse it off, store it and run it through the laundry.
  • Disposable diapers are easier to change – all of the materials are in one convenient pack so you don’t have to waste time stuffing the diapers. They also have tabs that are easily adjustable and double elastic around legs and the back for a more secure fit.
  • Disposable diapers need to be changed less – because of the absorbent polymers in the middle of the diaper, moisture is wicked away from the skin and allows the child to remain dry for a longer period of time
  • Disposable diapers leak less – because of the double elastic around the legs and back, accidents are less likely to happen.

CONS:

  • Disposable diapers contain chemicals – some parents worry about the effects coming into contact with chemicals has on their children. Disposable diapers are made up of mostly man made materials, the effects of which are still unknown.
  • Disposable diapers can rip – if you are not gentle with the tabs on the diaper, they can rip off. The leg barriers can also rip when stretching the diaper to fit around the child’s bottom.
  • Disposable diapers are not eco-friendly – while there are brands that claim to have biodegradable diapers, 3.4 million tons of disposables end up in the land fill each year. The time it takes to decompose is still unknown for many different brands.
  • Disposable diapers make potty training more difficult – when potty training, moisture is wicked away from the skin and children are not aware that they are wet and/or are not uncomfortable because the moisture is pulled away.
  • Disposable diapers lead to more diaper rashes – while disposables have a wicking layer, not all of the moisture is pulled away from the skin. Since disposables are more absorbent and need to be changed less, ammonia can sit on the child’s skin for longer amounts of time, causing a diaper rash to occur.
  • Disposable diapers are costly – you pay for convenience with disposable diapers. Depending on the brand and number of diaper changes, disposables can cost between $1700 and $2500 for two and a half years of diapering per child.

Do you have any other pros or cons to add? After seeing the pros and cons for both cloth and disposable diapers, which would you choose? Let me know in the comments below. 

Next week: What Do You Need To Cloth Diaper?